3 How To Store Your Data
Whenever you are embarking on a research project an important part of the planning process especially in the era of massive multiomics datasets & high resolution n dimensional microscopy is estimating how much data storage you are going to need. Storage can intuitively feel cheap and easy to acquire more of. This is largely because of how much its price has dropped over time in recent decades and the advent of cloud storage solutions. Thus it can be tempting to put off thinking about this problem until confronted with it. Ideally you should think about this problem in reasonable depth at the grant application stage or before and ensure that you have both sufficient funds and a solid plan in place to ensure the integrity, availability and security of your labs research data for the lifetime of a given project and beyond as needed.
Storage Space isn’t everything
Beyond how much space you will need there are other factors that you will need to consider. This includes but is not limited to a strategy for backing up your data & recovering your working state from those backups and performance requirements. Here we will cover various factors that you should consider in your data management planning.
3.1 Estimating capacity
A technique I recommend for estimating how much data you are going to need to store is Fermi Estimation. Those who’ve heard of it know this approach is a lot less intimidating than it sounds, it’s just a loosely structured approach to do back of the envelope calculations to estimate a quantity, here is A short list of nice examples. A tool useful in any number of situations where you need to make an estimate of a an uncertain quantity which might have a number of inputs is Guesstimate. I’d recommend using this to perform your Fermi estimates of how much data storage you are going to need. Doing some basic research to set your priors on file sizes & numbers of files, based on previous datasets from similar methods is often the best way to get started with your Fermi estimate. Here is an example set of estimations in guesstimate for the UCL imaging hub.
Whatever you end up with for your highest probability estimate you should probably add 50-100% more on top of that number, and/or lean towards the >95th percentile of the distribution of your estimated value. This may seem like a lot but but I don’t think I’ve ever met someone who overestimated how much space they would need and regretted it. On the other hand I’ve met many people who undershot and regretted it despite thinking they’d built in enough headroom. We often fail to account for everything, and it’s helpful to have some excess capacity around for performing operations on your data, moving data around etc. Some kind of performance degradation of storage devices is almost inevitable as they approach full capacity, a rule of thumb I use is to try and avoid exceeding >~70% usable capacity of my systems before expanding them.
In order to backup you data properly, in line with the 3-2-1 backup rule you will need access to usable storage capacity 3x that of the total size of your dataset. You should budget for this.
If you cannot immediately afford the data storage that you expect to need by the end of your project it is almost always wise to invest in storage technology which is capable of growing to accommodate your future needs even if you get slightly lower initial capacity. The alternative is convoluted cobbled together combinations of stop-gap storage solutions and/or greater expense in time & money when replacing and migrating from your initial improvised solution. Not to mention that trying to get sensible backups of this hot mess will make your storage admins cry tears of despair, and you don’t want your storage admins to despair you want the to be quietly confident that whatever you did the backups are so rock solid that they can fix it for you.
3.2 Categorizing / Stratifying your data
It is often necessary to prioritize or stratify your data so that appropriate policies can be applied to different datasets. Your raw data for example probably needs the most robust backups in terms of number of different copies and integrity of that data but it may not need to be very regularly updated excepting when new batches of data come in. Working data on the other hand, intermediate often ephemeral steps in analyses which change very regularly might want more frequent backups but may not need as many different backups or to keep them for as long.
As a researcher your priorities are typically to secure, the raw data, how you got from the data to your results and your results themselves. The first two are key and the latter a convenience so you don’t have to re-run your analyses to retrieve them. You have succeeded at reproducible analysis if I can delete all your results and you don’t really care, because getting them back is at worst a minor inconvenience.
Top priority generally goes to your raw data and it’s associated metadata. The metadata is critical as a directory full of raw sequencing data files is useless unless you know to which sample/experimental condition each file belongs. I would advise keeping a structured copy of your experimental metadata at the same location as your raw data even if you have another system to store your metadata for example in a more centralized database. co-locating the two reduces the risk of them becoming decoupled and vital metadata being lost. Defend in depth against data loss.
Next highest priority goes to the code / compute environment which permits you to generate your results from your data & those final results. If your code is under source control e.g. git (Section 4.3.1) this is quite easy to achieve. You can push your code to a remote git server on a platform like github and/or gitlab indeed setting up automated mirroring of git repositories between these platforms is quite simple (Section 3.3).
lower priority goes to intermediate compute products which can be re-generated as long as the code and data survive.
Some non-technical definitions of two important concepts in planning how to recover from a problem with your data storage:
- Recovery Point Objective (RPO)
- From what point in time do you want to be able to recover?
- If there is an issue can you loose the last Minute/Hour/Day of data without too much of a problem?
- Recovery Time Objective (RTO)
- How long can you go between a problem occurring and you having restored your data storage to working order?
- How long can you spend trying to fix the problem before you have to cut your losses and get back to work?
Think about how these concepts apply to the different categories/strata of data that we considered above.
If your storage technology enables it it is often useful to keep snapshots of your data which you then prune as you get further back in time e.g. hourly snapshots kept for a day, dailies for a week and weeklies for a month etc.
If recovery time was your priority i.e. you need to get everything back up and running as fast as possible and you can afford to loose a little data then you might roll back to the last good snapshot and not spend time cherry-picking files from more recent snapshots to get yourself the most recent good versions of all your files. If recovering from the most recent point in time possible is your priority and you can afford a little downtime while you pick out all the most recent versions of your files then you might do this instead. The important thing is to think through what your priorities are ahead of time and plan your backup and recovery strategies accordingly.
The 3-2-1 rule of backup is generally formulated along the lines of:
- 3 Copies of your data
- On 2 different devices / in 2 different formats
- plus 1 off-site copy
It can also be a good idea to use two different mechanisms for your off-site copy and your 2nd local copy. That way if something breaks with one of your approaches and there is an issue with one of your backups the other will not be affected by the same problem.
3.2.1 Deleting Data
You may be legally obligated to keep certain types of data for a specific period of time, or required to do so by your institution, or by a journal in which you have published your research. When thinking about a data deletion policy you should always consult your institutional policies and the relevant standards and practices for doing so. For example it is commonplace that data underlying a research publication is required to be preserved for 10 years.
“data underlying publications should be retained for 10 years from the date of any publication which fundamentally relies on the data”
Trying to keep everything forever gets expensive and impractical quite fast. Consequently you will need policies in place to delete data. However, wherever possible it is best to design workflows which stratify data at the time it is generated. Place data that can safely be disposed of in locations that facilitate its disposal, such as explicitly temporary directories. What can you automatically flag, and what will require manual review, to be considered for deletion? How can you structure your workflow so as much as possible lands in the automatically detectable bucket?
Be wary of automated deletions, they make sense for some things like pruning snapshots from backups but any process that can automatically delete your data is inherently dangerous and should be treated with caution. Automatically flagging data to be deleted and waiting for your review and approval before doing so is probably best, if there is any probabilistic component to the flagging, and you can keep on top of the review process.
What data should you consider deleting?
- Redundant copies of things (that are not part of your backup strategy)1
- Stuff that would be useless without provenance that doesn’t have provenance.
- If you generated a random temporary file whilst developing your analysis and you’ve got no idea how you made it or where if came from you can probably delete because if you can’t explain where it came from you won’t be able to use it anywhere anyway.
- Stuff that you can get back
- Intermediate data files which you can deterministically re-generate from your code, raw data and compute environment.
- Versioned files that you downloaded from the internet that you should be able to get back from the repository from which you originally downloaded it. This only applies to resources where they have versioned downloads that will let you get back the exact same data file from the metadata i.e. version information that you kept.
3.2.1.1 Have Clear Policies on Data Deletion
When deleting data, especially other people’s data that has been entrusted to you it is essential to have clear and well communicated policies.
Tell people up front what guarantees you can and cannot make.
How long can you keep it
How much can you keep
How fast can it be accessed (this can get a bit more complicated, but may be important for certain use cases)
What is your back-up policy, so they know what additional measures they may need to take
Make this information easy to find, going forward and reiterate it fairly often in communications
Very vigorously communicate any changes in data retention policy so that people know what to expect and when.
Give lots of notice, follow up with reminders of increasing intensity as the deadline approaches
It might be a good idea to provide a means of affirmatively acknowledging that the user is aware that the data will be deleted and is OK with this
If possible use multiple channels of communication
Provide easy ways for people to get a copy of their data, get help getting a copy of their data, or extend the period for which you are able to store it if this is a possibility.
Even If you are going to delete data in the course of normal operations and without a change in policy for some things you may wish to notify the user of any impending deletions.
If you are disposing of devices with data stored on them then caution is warranted.
If the data is not particularly sensitive and your entire drive is already encrypted at rest then you may not need to do anything as long as the encryption key is not located on the device anywhere and you are unconcerned about ‘store-now decrypt’ later attacks if you are not using particularly strong encryption or quantum safe cryptographic algorithms. If you want to exercise additional caution reformat the disk. If you want to exercise more caution and are OK with putting a bunch of additional writes on the device, write over the whole drive once or twice with random data after re-formatting before sending it off to a re-furbishing service.
When overwriting a device to attempt to ensure complete data deletion don’t use all 0s you want something basically incompressible so SSD controllers won’t lie to you about having written an entire disk’s worth of 0s and secretly only wrote 1 block claiming to be a whole disk’s worth of 0s.
If the data is critically sensitive, re-format the device and write over the entire device multiple times with randomly generated data, then physically destroy the device on which it was is stored yourself with a power tool (wear eye protection) and spread the resulting debris out over a couple of waste collection cycles. If it is a hard drive ensure all the platters are shattered if it’s an SSD ensure all the NAND flash packages (chips) are broken. Physically destroy all apparently non-functional devices containing sensitive data as they may have a trivial defect that might permit a 3rd party to recover data from them if they fix the device. I’m not kidding. This may seem wasteful but if your data is actually critically sensitive this is the only way to be sure.
3.2.2 Practice Recovery
3.2.2.1 Personal device loss
Game out your recovery process
How would you recover if one of more of your personal computing devices disappeared?
What concrete steps would you take to get back to work if personal computer was no longer available to you. How would this go if you lost your phone at the same time?
Grab an old laptop and see how long it would take you to get back up to speed, if you even can completely? What would you loose? How important is it? how can you improve this?
If you haven’t done this yet have a friend to ‘steel’ your laptop and refuse to give it back to you until you figure out how you would deal with this situation. If you have a friend who you know hasn’t got a plan for this scenario ‘threaten’ to ‘steel’ their laptop until they’ve got one. (This should no be construed as advice to actually steel or threaten to steel your friends things but rather to apply social pressure to them to have good backup & recovery strategies and to leverage social pressure to force yourself to do the same.)
3.3 Storing Code
In Section 4.3.1 Source Management we will cover git which is how I recommend that you manage your code and indeed other text. Here I will just detail some steps you can take to automatically keep a backup of your code on git hosting services.
A simple way to have another copy of your git repository is to set up mirroring of your repository to another git hosting provider. Let’s say that you have your code in a gitlab instance like gitlab.com or renkulab.io/gitlab but you also want a copy in github. Gitlab supports repository mirroring your repository to other gitlab instances as well as to github and other providers, there are detailed instructions for this in their documentation.
You will generally want to configure a ‘push’ mirror from gitlab to github if gitlab is your primary repository. If github is your primary repository and you would like to ‘pull’ from github to gitlab this is a paid feature in gitlab.
There are 3 main steps.
1. create a repository to mirror your project to.
Create an empty repo in github, no README no license just empty.
2. Generate an access token to authenticate and authorize the connection between the repositories.
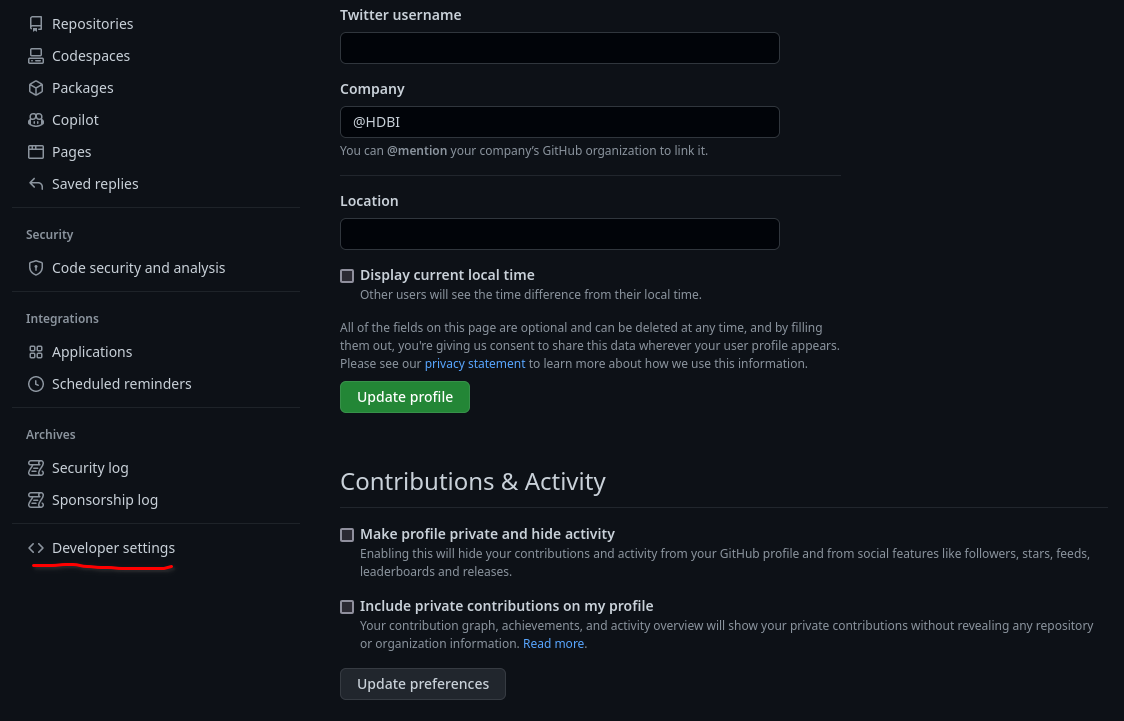
In github go to:
Settings >developer settings >personal access tokens >tokens (classic) >generate new token >generate new token (classic)
The developer settings are at the bottom of the settings menu on the left.
You’ll want a ‘classic’ token at time of writing the fine-grained scope tokens do not support repo syncing. (You may want to revisit this this in the future in case you can get a token scoped to a single repo in accordance with the principle of least privilege.)
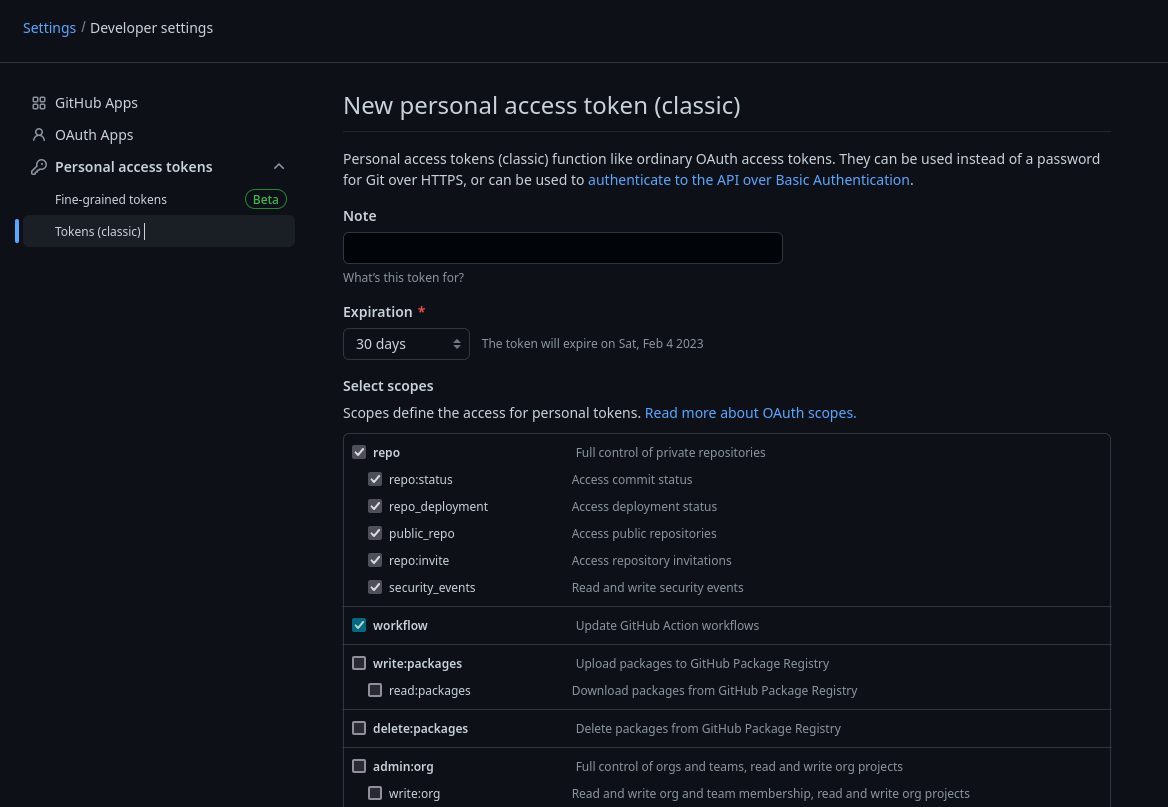
PATs SHOULD BE TREATED LIKE PASSWORDS keep them somewhere safe like in your bitwarden vault. The ‘scopes’ needed are the ‘repo’ permissions set and ‘workflow’.
You can set an expiry date for your tokens you can balance the risk of leaking a token without an expiry date against forgetting to renew the token and having sync stop working without you noticing.
3. Configuring your original repository with the mirror repository URL and the access token.
Settings > Repository > Mirroring Repositories
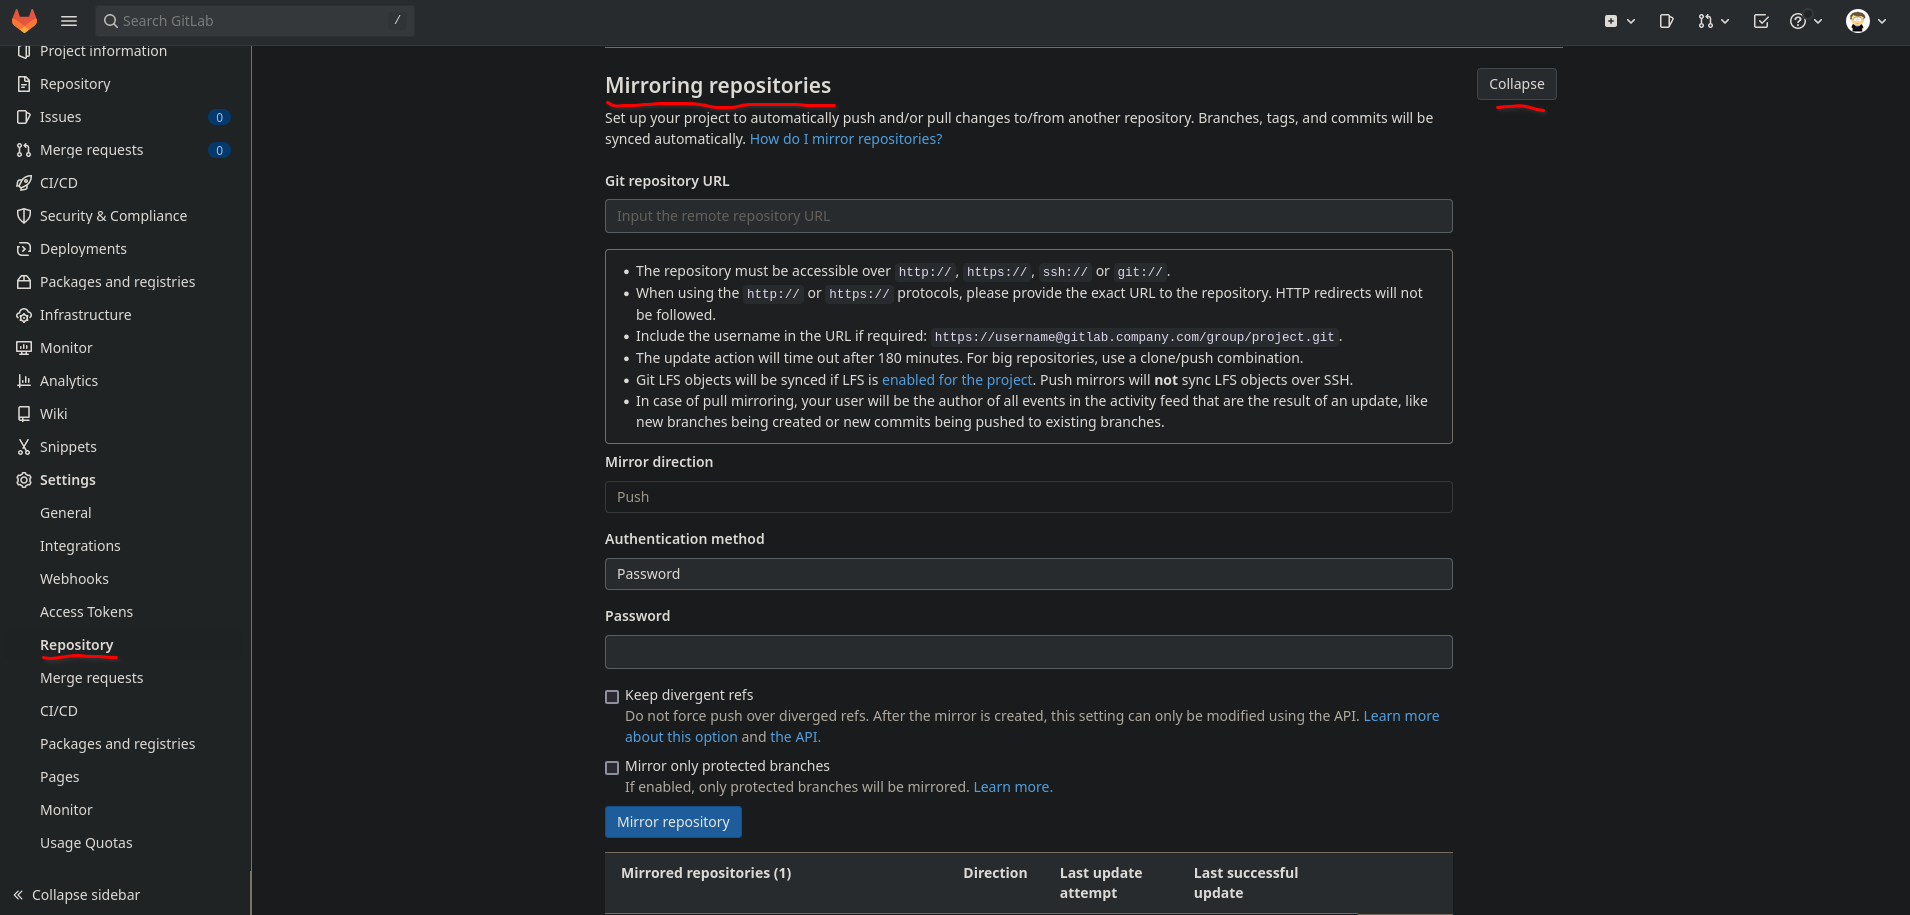
The PAT from GitHub goes in the password field, and is also included git repository URL in the following form:
https://ghp_xxxxxxxxxx@github.com/username/reponame.git
To sync to another GitLab repo instead of GitHub you will need a PAT from GitLab. To generate a PAT in GitLab got to:
User Icon Dropdown Menu > Preferences > Access Tokens
The scopes needed in gitlab are read_repository & write_repository.
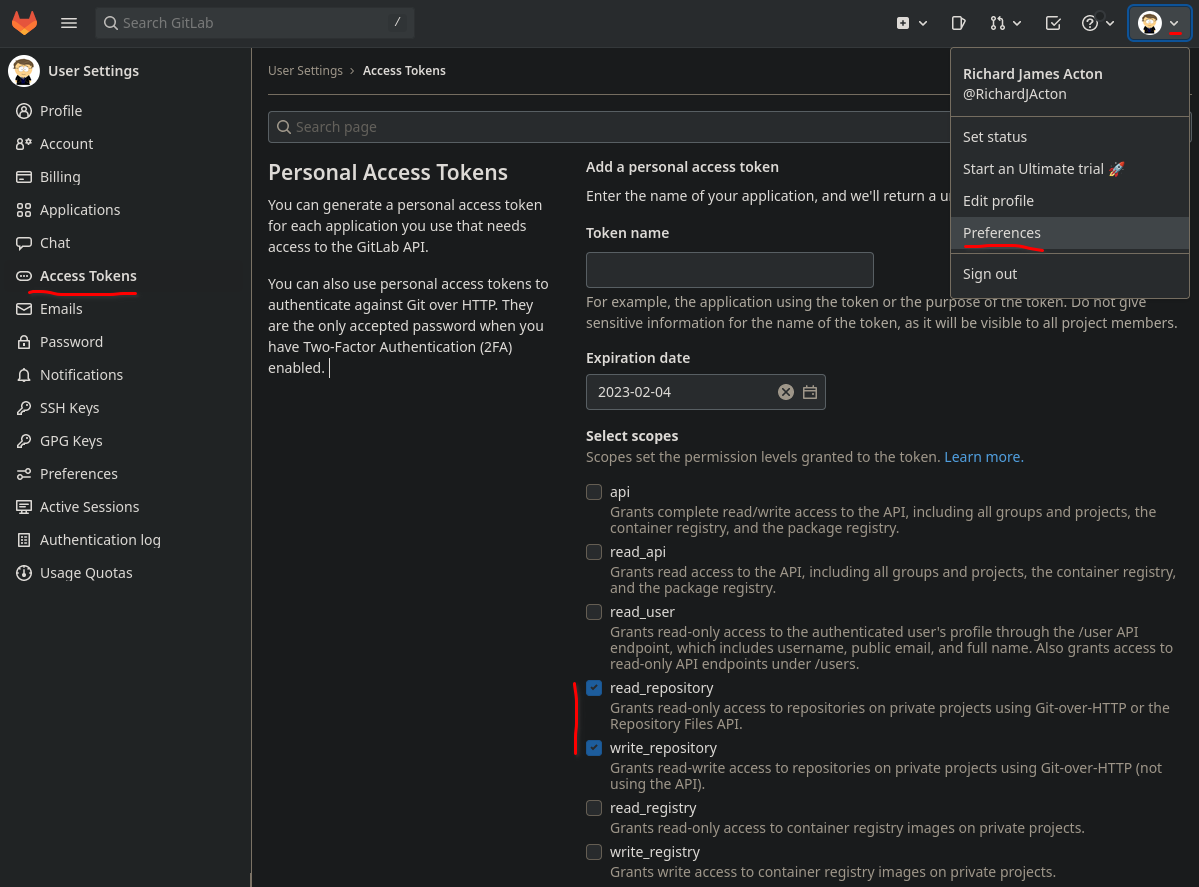
This can then be used in the same way as a the GitHub PAT for the purposes of mirroring the repo. The URL format is a little different:
https://username@gitlab.com/username/reponame.git
The PAT does not need to be in the URL only in the password field.
You can also push your repository to multiple remotes rather than connecting your remotes together and pushing to only one. This solution is probably more error prone as it is easier for your remotes to potentially get out of sync so I would advise mirroring over this.
git remote set-url --add --push origin git://original/repo.git
git remote set-url --add --push origin git://another/repo.git
(See this StackOverflow answer for additional explanation and discussion of this solution)
3.3.1 Making your git repo citable
To generate a DOI so that you can cite your code you can use Zenodo to store a snapshot of your repository. You can associate a commit in the history of your git repository with a named tag, a mechanism commonly used for releasing named versions of software or other content (see: ?sec-semantic-versioning)
When planning to deposit something in Zenodo it is a good idea to test everything out and make sure that it is all working first at sandbox.zenodo.org where temporary records can be created for testing purposes.
To get started you need a .zenodo.json file which contains all the information needed to produce your citation. The .zenodo.json file must conform to the JSON schema defining a valid .zenodo.json which is described in more detail in the Zenodo developer documentation and can be checked using a JSON schema validator. Alternatively the json editor tool lets you use a JSON schema to generate a web form which you can fill out, this link goes directly to json editor with the Zenodo schema pre-loaded.
It is also possible to automatically generate a .zenodo.json file from a CITATION.cff file using the cffconvert tool. CITATION.cff files are “plain text files with human- and machine-readable citation information for software (and datasets)” which work with several tools:
- github where they are parsed and information in them displayed on your repo page, This feature is not yet available for gitlab repos but there is an open issue about getting it added.
CITATION.cfffiles also work directly with github’s zenodo integration skipping the need for a.zenodo.jsonfile though it appears that some properties cannot be directly translated between these two formats, so the best zenodo results will come from a.zenodo.jsonfile. cff-initializer is a useful tool for generatingCITATION.cfffiles with a web form. - Zotero can generate
CITATION.cfffiles and the browser extension recognises them for importing citation information from repositories.
Note that when adding a grant to your project, Zenodo integrates with reporting lines for some grant awarding agencies. Consequently I would suggest filling this out in the Zenodo web UI as there is auto-completion for funding bodies and grant codes. There is often ambiguity in name and grant code format so if you want to get them correct for easy automated discovery I’d start here.
The
gitlab2zenodotools makes it easier than using the zenodo API directly to deposit a tagged release of your project on Zenodo and generate a DOI for it. With it and gitlab CI/CD you can also automate updates to Zenodo whenever you release a new version. You can in installgitlab2zenodofrom pypi with:pip install gitlab2zenodoTo use
gitlab2zenodoyou will need a Zenodo API key. Use the drop-down menu next to your username in the top right of the Zenodo site and Navigate to:Account > Applications > New token. You will also need to do this separately for sandbox.zenodo.org. To use the full functionality ofgitlab2zenodogive it the scopes:deposit:actions,deposit:write, &user:email. Copy these tokens and store them securely in your password manager, be sure to name them so you know which one is for the sandbox (See: Section 3.5).gitlab2zenodoexpects the environment variableszenodo_tokento be set in order for you to use it. If you are using it interactively to test your.zenodo.jsonfile you can do this withexport zenodo_token="YourKeyHere". If you are using it with gitlab CI/CD automation, then; from you repo page go toSettings > CI/CD > Variables > Add Variableusezenodo_tokenas the key and your token string as the value. This variable will now be available in the environment of your CI/CD runners. Use the sandbox token while practicing and change it for the real one when your are readyCraft a
.zenodo.jsonfile that you are happy with by usinggitlab2zenodoto send it to sandbox.zenodo.org. You can do with with the-soption:g2z-send -s -m .zenodo.json. Once you have run this you should see this submission staged in theuploadspage on sandbox.zenodo.org where you can preview it.Setup release automation with gitlab CI/CD. Setup you API token as described in step 2. This is an example
.gitlab-ci.ymlfile:# You will likely have other stages here like building and/or deploying your project stages: - doi deploy_zenodo: stage: doi 1 image: python:3.6 rules: 2 - if: $CI_COMMIT_TAG =~ /^v?[0-9]+\.[0-9]+/ script: 3 - pip install gitlab2zenodo 4 - git archive --format zip --output ${CI_COMMIT_TAG#v}.zip ${CI_COMMIT_TAG} 5 # - g2z-send -s -m .zenodo.json ${CI_COMMIT_TAG#v}.zip 6 - g2z-send -p -m .zenodo.json ${CI_COMMIT_TAG#v}.zip- 1
- We are using the Python:3.6 image based on debian.
- 2
- This means that this will only run when the commit tag begins with a ‘v’ and is follow by some digits, a ‘.’ and some more digits
- 3
-
Install
gitlab2zenodoin the CI/CD runner - 4
-
Make a
.ziparchive of the repo state at the current commit (tag),${CI_COMMIT_TAG#v}is a default environment variable that contains the name of the tag for example: ‘v0.0.1’. - 5
-
The
-sflag indicates thatgitlab2zenodoshould use the sandbox, test things with this version. - 6
-
-pmeans publish the result immediately - If you don’t set this option you must manually review and publish the draft on the zenodo website. A subsequent run of the pipeline will fail if there is an unpublished version staged but not published.
Set
zenodo_record. Once your first version has been published in order to update it and not simply create a new entry every time this pipeline runs you need to set the environment variable:zenodo_record(this can be done as described in step 2). The value ofzenodo_recordis the zenodo ID of your first entry, for this book it is: 8021382, it’s at the end of the zenodo url. I would suggest testing your CI/CD with-sthe sandbox. First check the first draft is correct at the sandbox site and publish it manually there, then set thezenodo_recordvalue and use both the-sand-pflags on a new commit with an updated version tag to check that the next version is auto-published. Finally deletezenodo_recordin preparation for publishing the real version.Publication: Repeat the process in step 5 without the
-sflag set. That’s it your project is published and you’ve got your DOI!Get the DOI badge from your zenodo record and include it in your project README etc. You will also find a ‘Cite all versions’ DOI on the zenodo page which will always point to the latest revision of your work as well as the version specific DOIs, which display a banner saying a newer version is available when visited if there is a newer option. It may be easiest to include the cite all versions DOI in your README so that it will always remains up to date, and encourage people to use the version specific citation when they cite your work.
Zenodo integration with github is a little better at the moment. Github has a concept called ‘releases’ which correspond to a git tag which marks a particular point in your repository’s history as a released version of the software. Checkout the Github documentation on using zenodo integration
- list tags:
git tagor to filter tags:git tag -l "v*" - Create an annotated tag:
git tag -a v1.0.0 -m "Description..." - Create a lightweight tag:
git tag v1.0.0-tmp"(lacks author information, can’t be signed) - Get details of a tag:
git tag show v1.0.0 - Retrospectively tag a commit
git tag -a v0.0.1 <commit hash> - Sharing tags
git push <remote> <tagname>, multiplegit push <remote> --tags - Deleting local tags
git tag -d <tagname> - Deleting remote tags
git push origin --delete <tagname>(use with caution if other might use these tags) - Checkout a specific tag in a branch
git checkout -b <branch> <version>, you can just dogit checkout <tag>but this will leave you in a detached HEAD state. (Checkout git worktrees if you’d like to have multiple branches checked out at the same time).
A popular convention in the naming of software releases is the concept of semantic versioning which is summarized as:
Given a version number MAJOR.MINOR.PATCH, increment the:
- MAJOR version when you make incompatible API2 (Application programming Interface) changes
- MINOR version when you add functionality in a backwards compatible manner
- PATCH version when you make backwards compatible bug fixes
For example a piece of software might have the version 1.8.12 (said: ‘one dot eight dot twelve’, not: ‘one dot eight dot one two’). This is the 12th set of bugfix patches, for the 8th set of backwards compatible changes e.g. adding some new features that don’t affect the old ones. This is also probably technically the 2nd version of the software as the 0.X versions of the project were probably development and testing versions with 1.0 being the first stable release. A future 2.X release might change the way some of the things in the 1.0 series worked known as making ‘breaking changes’. Generally in a larger software project it is a good idea to signal these changes to your users with code ‘lifecycle’ information. Checkout the {lifecycle} R package docs for some good general advice on this that applies beyond R.
BEWARE Not all programs that use a X.Y.Z naming convention for their releases follow semantic versioning conventions and even for those that do what constitutes a ‘breaking change’ can be a tricky and context dependent question.
A critical point in the history of an academic piece of software might be the version of an analysis used in a published piece of research. This is probably worth marking in the release notes if you are both making the software and publishing about the new analysis/workflow that it enables.
3.4 Choosing Storage
Now that we’ve estimated how much data we are going to generate and thought about our priorities for preserving different subsets of it we are at the stage of thinking about purchasing storage capacity.
You will need to think about the question of how your data backup, recovery and integrity needs are met by whatever solutions that you choose to use.
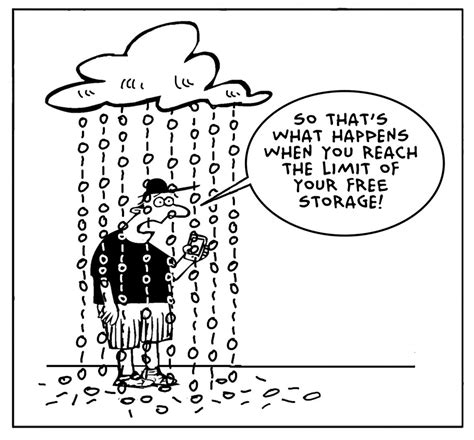
3.4.1 “The Cloud” ⛈
When considering cloud storage solutions remember that the cloud is just someone else’s computer and you’ll have to pay to rent and maintain the hardware underpinning what resources you use. If all your data is in the cloud you are at the mercy of your cloud provider’s pricing and will have to pay whatever rate they decide to charge you if you cannot readily move your data. I would advise against using cloud storage as your primary storage medium. Have local storage and use the cloud as a backup. In addition avoid proprietary cloud storage solutions, make use of standardized approaches that will let you move your storage to a different vendor with relative ease if pricing changes.
I try to adhere to the rule “Never do in the cloud that which you could not (theoretically) do on premises.” This translates to only using cloud services which you could host your own drop-in replacements for. Be as close to ‘just changing some config files for locally hosted API endpoints and restoring from backup and you can pickup where you left off’ as possible. This gives you maximum optionality in choice of hosting provider and bargaining power on prices.
For very large datasets the ability to ‘bring the compute to the data’ offered by cloud solutions and the ease of collaboration in cloud computing environments is indeed highly valuable. This utility is not however limited to the ‘public’ cloud infrastructure operated by major providers like Amazon web services and Microsoft Azure. Operating your own ‘private’ cloud infrastructure is increasingly accessible and there are some emerging standards in cloud computing which increase interoperability. Opening the door to ‘hybrid cloud’ solutions which might make use of local resources as well as resources from multiple ‘public’ cloud providers. If you are going to use a ‘public’ cloud solution I would recommend avoiding the likes of Google/AWS/Azure in favor of independent cloud providers with less proprietary ecosystems and vastly superior customer service such as Linode.
3.4.2 Central/Institutional Storage Resources
Understanding your institution’s research data policies, infrastructure & resources is important to inform your planning. Speak with your IT, core facility, and often HPC (High performance computing) teams about their data policies and understand what data resources they can and cannot offer you. For longer term archival storage another place that often has some help to offer are any library sciences specialists at your institution.
Unfortunately there is often a lack of clarity about where the responsibility to ensure that you have adequate data storage arrangements for your research data lies. This can easily lead to data loss if responsibility is not taken at the level of the research group with the PI setting a clear policy and ensuring that it is adhered to by lab members. This article (McInturff and Adenis 2022 [cito:citesAsRecommendedReading] [cito:discusses] [cito:agreesWith]) has some useful practical advise for setting up standard procedures for the handling of data in a research group. Important components of this can be seemingly simple things like agreeing on file and directory/folder naming conventions (see: Section 3.6).
Is there sufficient capacity at a central resource or can it be expanded according to your needs?
Is their backup policy sufficient for your needs? How do you access and use backups as an end user, what kind of control do you have over the data recovery process? Test it and see how recovering from a data loss actually goes.
Does the central storage meet your performance requirements? Data storage only accessible over a relatively slow internal network may not be up to the task of storing and serving data from an instrument that generates a lot of data quickly, or an analysis which reads a lot of data quickly.
Users of institutional facilities should ask these questions to ascertain how quickly and completely a central facility should be able to recover in the event of an incident. Is this recovery time compatible with doing your job during any downtime whilst things are fixed? Still closer attention should be paid to this question if you are operating your own storage.
3.4.3 Operating Your Own Storage
As a last resort if you need to manage your data yourself here is some advice. I stress that if you can get a professional storage admin in charge of managing your data through the resources available at your institution do this before embarking on operating your own storage. Managing your own storage is not a passive process it requires active maintenance and monitoring.
Hard Drives (HDDs) die and data on them becomes corrupt if not actively maintained. Solid State Drives (SSDs) and other solid state storage media also die and data stored on them also degrades over time without active maintenance. Simply placing your research data on an external storage medium or keeping it on your local system and leaving it there is a bad idea for several reasons.
- You may loose your data if there is an issue with that device and you do not have other backups.
- Your data may be corrupted without you even knowing about it through ‘bitrot’ random bitflips in your imaging or sequencing data that change the file’s meaning but do not make the file unreadable. These events are rare in absolute terms because of the reliability of modern storage media but because of the sheer size of many of the files they are common enough to warrant taking precautions against them.
- Other people who might need to access your data cannot readily do so, if they do not have an understanding of the idiosyncrasies of how you organised it.
If you are looking to purchase your own small to medium sized storage solution (10s of Tb) I recommend a NAS (Network attached storage) appliance over an external HDD/SSD as a NAS can be configured with some redundancy to help ensure the integrity of your data. There a number of commercial offerings in this space (e.g. Synology, QNAP), few are terribly satisfactory in their implementations of data redundancy & integrity though. Importantly they are also not as readily scaled up to larger systems. In my view one of the best options currently available is a device running a TrueNAS operating system, or XigmaNAS a set of free and open source operating systems developed specifically for storage appliances. The main reason for this is they make use of the ZFS file system which has probably the best data integrity features of any filesystem currently available. If you ever get yourself into such a mess that you need professional help to recover your data the professionals will thank you for having used ZFS.
You will need some cooperation from your institution’s IT team to setup a NAS on their network so be sure to consult with them first.
If you need a small NAS for Your Lab pick yourself up a TrueNAS Mini from a local iXsystems distributor, you should also talk to them if you need a large storage appliance.
3.4.3.1 Redundancy and Raw vs Usable capacity
There are a variety of ways to implement data redundancy the term I’m using for various approaches to error detection and correction. This refers to a a whole family of mathematical tricks to detect and correct for errors in messages, ideally more efficiently than having to duplicate the whole message. The canonical example of this is is a Hamming code named for their inventor for Richard Hamming, other examples include erasure encoding. These techniques let you construct storage systems such that if you loose some number of drives to technical failures you can still infer their contents from the information on the remaining drives. Thus with redundancy you are resilient to data loss up to a level of simultaneous hardware failures that you can tune according to the level of risk you want to take with your storage.
If you are managing your own storage you will need to account for how much redundancy you want in your data when planning how much storage you will need. You will need to use some of your raw capacity if you add redundancy to your data. Thus the usable capacity that you have to actually keep files in will be reduced. If you are taking the almost always preferable route of using central/institutional data storage resources they have likely already given thought to data redundancy though you should always inquire about what measures have been taken so that you can plan accordingly.
Redundancy is not a backup, it can when used properly, improve up-time and ensure data integrity. However, just because your data is redundant within one system it does not mean that it is properly backed-up. Choice of redundancy method can also significantly impact on performance. For example a 2 way mirror roughly doubles read speed but not writes and means you need 2x usable capacity in raw storage - storage layout is a complex trade-off. Recovering from a hardware failure can still take a long time and impact on performance. Even if you don’t loose data you still have to expend compute cycles inferring what was on the failed hardware and writing a new copy of it out to the replacement drive.
You will hear the term RAID (Redundant Array of Inexpensive/Independent Disks) used a lot in discussions of configuring redundant storage, there are a variety of types of RAID.
Selecting a particular layout and degree of redundancy will depend on a number of factors and detailed discussion of which drive topologies to chose for which purpose are out of scope for this document. Here are some resources to refer to when making this decision. They emphasize making this choice for TrueNAS/ZFS systems which is what I recommend if you are operating your own storage appliance:
- Soliciting advice for your specific use case on these fora is likely to yield good results:
- General Level1Techs
- TrueNAS specific TrueNAS Community Forums
- ZFS specific advice for the more technical user:
3.4.4 Cost, Availability, & Integrity
The more available your data and the higher your confidence in its integrity, the more it will cost to store and the more energy will be expended to store it. An archival copy on a slow offline tape drive is not very available and it’s integrity may be questionable, but it’s cheap in cost per Tb. If a hash is taken of the file when it was stored and the hash is stored in multiple copies so that you can have a high degree of certainty that the hash is correct then you can compare the hash of the file on reading to the one computed when it was originally stored. If they match the file is very likely fine if they don’t you may need to go try another backup copy as there’s likely no way of fixing the missing data and it may be difficult to assess the scale and importance of any corruption. (A well implemented system automates such hash comparisons so the end user doesn’t have to do this manually - but it is a useful concept to be aware of when thinking about these problems, and not all systems are well implemented.)
3.4.4.1 Data Availability
If my data is archived on a slow tape drive and I can’t easily query it will it every be used? Depending on the nature of the data this might matter more or less. If I’m just going to be batch process the files then it matters less. If I’ve got raw sequencing data for example there’s not a lot I’m likely to do with a fastq file that does not involve all of the file. This means that I only really need sequential access to the files and it might be fine to stick them in a tape archive with relatively minimal availability trade-offs. Loading the data from the tape onto temporary storage for alignment will probably take less or a similar amount of time to computing a full sequence alignment for that data (with current storage and compute speeds) so the time taken to retrieve the data is not massively out of proportion to the time that it will take to perform other tasks on the data once it is retrieved. This also requires that I have a fast and accurate record of the metadata for the files on the tape that I can search to see which ones I want to retrieve.
On the other hand if I’ve got sequencing data that’s already been aligned then I might be interested in constructing queries that look a the number of reads meeting certain criteria over the same set of genomic coordinates in many different samples even potentially from numerous different experiments. This requires the ability to read data from within the alignment files but not the whole file, known as random reads. If I’ve got to read the whole file sequentially from a tape such queries would take a very long time. I might be able to speed things up by fast forwarding over the bits that don’t have data in them from which I want to read based on an index of my file. If they are on a hard drive I can skip around between the needed chunks by moving the read head - which is faster than linearly scrubbing back and forth along a tape. Better yet if they are on an array of hard drives I might be able to read different chunks from different physical disks in parallel to speed things up. Lots of SSDs e.g. many using the NVMe protocol, can parallelise reads within a single ‘drive’. Individual SSD devices are essentially small arrays of solid state storage devices, and so can retrieve the data still faster than an arrays of HDDs. This lets me improve not just the linear speed at which I can write a continuous block of data but the speed at which I can read and write at random within the data known as “IOPs”. All of this is abstracted away by various performance specification metrics and we don’t usually need to worry about the implementation details but a high level picture of these considerations helps to put the performance numbers in context.
3.4.4.2 Data Integrity
If I’ve got 3 copies of some data on 3 drives it’s a bit of additional work to compare their hashes to the original hash which I hopefully also stored in multiple copies when I originally archived the files. If all of the hashes don’t match what can I do about it? I might be able to painstakingly manually assemble a complete file from the copies assuming different parts are corrupt in each, but this is probably beyond my skill and both slow and expensive.
Hard drives are flakey they wear out, they break and occasionally bits stored on them get flipped at random this is also true of many SSDs especially the high density NAND flash in common use today. However it is possible to make a reliable whole from unreliable parts. This is discussed in Section 3.4.3.1 Redundancy and Raw vs Usable capacity advanced file system like ZFS can automatically compare the hashes of blocks of data on disk to copies of those hashes stored in the filesystem metadata and look for or infer the correct value of this block from redundant versions of your data. This takes energy as you must periodically ‘scrub’ your data looking for and fixing such inconsistencies, but this is readily automated.
Data storage is essentially transmitting data forward in time and is thus subject to the same kinds of physical constraints on ensuring the integrity of a transmitted message originally identified by Claude Shannon. Data integrity is probabilistic, you must decide the level of risk that you are willing to take with your data becoming corrupted and choose a technology accordingly.
3.5 Securing Data
This advice is good general cyber-security advice that anyone using a computing device could benefit from following given the modern threat landscape of just being a human on the internet.
If you handle personally identifying information, or other data to which general access is restricted you should adhere to the policies of the institution granting you access to this data. Most of the time as a researcher you should not find yourself responsible for administering the security for access to data to which access must be restricted for one reason or another. This requires IT security expertise and will generally be performed for you by a 3rd party, if such expectations are being placed on you and securing them properly is out of the scope of your responsibilities and expertise you should raise this with your supervisor/institution/funders. This is one of the reasons to be hesitant about operating your own storage, you are assuming the burden of responsibility for properly securing and backing up your data. If you are not operating storage with sensitive data but merely accessing it you still have security responsibilities. There are some general counter measures that you can take to improve your personal electronic security and that of any potentially sensitive data that you handle. Specifically you should take care to follow best practices with your access credentials to restricted data to ensure that unauthorized persons cannot use your credentials to access the data. In addition you should take great care to secure any local copies that you may have even temporarily made of such data.
Why? Every account should have a different unique password so a breach of one is not a breach of them all. No one can generate a different long random alphanumeric password with special symbols for every account you create and remember them all indefinitely.
What do they do? A password manager provides a secure place to store a long complicated and randomly generated password for all of the things you need to login to. But many have additional useful features The convenience of auto-filling passwords for you. Additional features like securely sharing credentials for shared accounts within organisations including TOTP codes, (Those 6 digit codes authenticator apps generate - more on these later), which can otherwise be a challenge to share securely. Checking to see if passwords in your accounts have appeared in lists of breached credentials. The ability to store files with private keys or other secrets.
Which one should I use? I would advise against using the password management features built into your web browser, disable these in favor of a dedicated tool which does this better. Whilst many are available Bitwarden ?sec-bitwarden is the only password management solution that I would currently recommend to the general user, KeePassXC is also a reasonable choice for the more technically inclined.
How should I use one? Secure your vault with a master password or passphrase which you have never used anywhere else before so that it cannot be found in any past data breaches. Secure your vault with a second factor (more on these below). Install the app(s) and browser extensions on the systems that you use. Gradually migrate all of your existing accounts over to your vault, each time you sign into a new site take a moment to add it to your vault. Start with major accounts that you are likely to be logged into all the time e.g. Google and work accounts, it may be helpful to disable browser auto-filling if you use it. This will help prompt you to switch to your password manager, though you may want to wait until you have completed your migration to delete any passwords stored in your browser
If you must share credentials for an account it is best to do so through a password manager, or failing that a secure link. Never send plaintext credentials in email! If you can avoid making use of a shared account you should, use groups where everyone who needs permission to perform an action on a service has their own account with those permissions. If this is not possible 1. complain to the service 2. store and share your credentials properly. The best option is something like a bitwarden organisation where all the parties who need access have account and permissions on a shared collection of credentials. If you must send credentials to someone who is not in a Bitwarden organisation you should use temporary secure links such as those provided by bitwarden send or similar services, these can be set to expire after a certain time and number of downloads, that way the link is useless to someone who later gains access to the communication. These should ideally be sent though an encrypted messaging app such Signal, SimpleX or a Matrix Client and not plaintext email as extra surity against their interception. You can also split a one time password and an access link between two separate communication channels - there is little point sending emails with a password and a link. It is best to have such out of band communication channels established in advance and in person so that you can be confident the intended recipient is the one at the other end. If sharing things in groups remember to practice the Principle of least priviledge and only give people access to the credentials that they need.
3.5.1 What is Multi/Two-factor Authentication?
A password is one factor, additional factors mean you need more that just 1 credential to login. Adding another factor means that if a malicious actor gets your password they still need this 2nd factor to access your account. You are not always asked to login every time using an additional factor, when you have logged in to a service from a device once it may remember that device and only prompt you for your password and not your additional factor on most subsequent login attempts.
3.5.2 What 2nd factor should I use?
The best second factors are hardware security tokens such as Yubikeys. In these devices the secrets are physically stored on the device and (usually) nowhere else this mean someone has to physically steal your particular key to login to your account. This does mean that it is advisable to have more than one and keep the other(s) in secure locations in case you loose or break your key.
Second best are those 6 digit codes generated by an authenticator app such as Google authenticator or Aegis (play, F-droid) these are called TOTP (Time based One Time Passcodes). For more details expand the box below on TOTP
SMS (text messaging on your phone) is better than nothing but much less secure than the other options. If you have other MFA methods available SMS should be disabled where possible as your security is only as good as your weakest 2nd factor. (if someone can spoof your phone number and intercept an SMS MFA code your hardware token does nothing to help you if you are allowing both methods to work as a 2nd factor on your account).
Avoid push notifications on your MFA, set yourself up to only authorize logins when you are making a careful deliberate choice to do so. Popular MFA solutions including those from Google and Microsoft often offer a prompt on your mobile device that will let you simply tap a notification to authorize a login attempt. This convenience feature has been exploited by attackers to bombard people with notifications until they authorize a login by accident in an attempt to stop the notifications. Stick with the classic TOTP codes if you can, these give you a moment to think about what are doing compared tapping a notification.
To reiterate: MFA is very effective and dramatically reduces how easy it is to break into your account, use it wherever you can!
3.5.3 Setting up a password manager & MFA
Constructing a good master password for your vault.
- One that you have NEVER used before, not even a variant on it
- Does NOT contain any potentially guessable or public information about you, e.g. birthdays of yourself or relatives, pets names, address information, this includes any clever interleavings, remixes, or anograms of these values etc.
- Long
- Memorable
- Easy to type
These last three often seem to be in conflict however they need not be. Passphrases, that is a series of dictionary words, with perhaps a couple of numbers and special characters are the easiest way to achieve all of these features at the same time. This XKCD has some sage advice on password creation:
WARNING modern GPUs can now perform password guessing at incredible rates on the order of millions per second so adjust accordingly and for highly sensitive applications which might be subject to a targeted brute force attach consider passphrases of seven or more words in length.
(Whatever you do don’t use correct horse battery staple as your passphrase though - I just wrote that from memory long after the last time I read the comic so that passphrase is well and truly burned)
Getting Started with Bitwarden
- Text Bitwarden official getting started documentation
- Video Bitwarden Password Manger Beginners Guide
For more general information see ?sec-use-password-manager, and ?sec-mfa.
TOTP uses a secret key stored on your device combined with the current time through a hash function to generate the one time codes. This key is stored on your device and should be securely backed up, google authenticator does this via your google account so be sure to secure your google account or people may be able to steal your TOTP keys by ‘restoring’ your google account to their device. Note that using google authenticator means if you loose access to your google account you likely loose access to all your other accounts as well. The same applies to Microsoft’s authenticator. For an app like Aegis with no cloud backup of your MFA keys export an encrypted copy of your TOTP database and securely back it up to protect from device loss.
You will often also be given a set of backup one time codes to use in the event that your device is lost, be sure to make a secure copy of these, it may be safest to simply print these directly (don’t save any intermediate files) and keep the paper copies in a secure location. If you make encrypted electronic copies of these avoid placing them only in the same place where your TOTP secret keys are backed up or in the same place as your password is stored. They are a backup for your 2nd factor so if you store them with your password and that storage is breached you no longer have 2 independent factors.
TOTP is an open standard (see: RFC-6238) not everyone implements it according to the standard and some try to add their own stuff on top if you can stick to strict implementations of the standard.
Hardware security tokens such as the Yubikey products produced by Yubico can implement a number of standards to provide cryptographic functions that include authentication i.e. letting you login to things. The practical upshot is a cryptographic secret of some kind exists only3 on the physical token and never leaves it such that in order to steal the secrets and breach your account an attacker must physically steal the key. This is in contrast to TOTP for example where the secrets whilst well protected could in theory be stolen remotely from the device on which they are stored, though this would likely require exploiting un-patched software vulnerabilities. Choose security tokens that implement open standards see the FIDO2 alliance.
- Text (quickstart) Official Yubico Yubikey setup guide
- Video (quickstart) Setup a 2FA Key for MAXIMUM Online Security! (Yubikey Tutorial)
- Video (longform) YubiKey Complete Getting Started Guide!
Keep yourself up to date This is a rapidly moving space advice can go out of date quite quickly here are some good but accessible news sources that you might be able to work into your media diet.
- Podcast (The ‘Most Entertaining’ security podcast) Smashing Security
- Pocast (“Computer security & privacy for non-techies”) Firewalls don’t Stop Dragons
- Text (in-depth investigative) Krebs on Security
Other measure that you can take to ensure that your security practices best protect any sensitive data that you are handling include:
- Keep your software up to date in particular your operating system and web browser
- Use full disk encryption on your computing devices. Note that you should always backup before enabling this. You should also take great care with the storage of the password because if you loose it, and the encryption is properly implemented, there should be no way of recovering/resetting your password. This is now standard on most newer mobile devices.
- Windows Windows’ whole disk encryption options leave something be be desired. On non-pro tier editions ‘Device Encryption’ which stores an encryption key in onedrive is available with the more fully featured ‘bitlocker’ only available available to those with professional tier licences (see: Device Encryption in Windows) 3rd party options like VeraCrypt exist but being non-native solutions not explicitly ‘blessed’ by the Windows developers they are more prone to breaking when Microsoft occasionally changes things which affect the way that they function. Unfortunately Windows’ solution also conflates 2 distinct functions that of encrypting your data and that of tying your drive to a specific system so recovering data encrypted on one system by putting the drive into another may be a problem even if you have your encryption password.
- MacOS This can be enabled with FileVault2
- Linux Many modern and popular Linux Distributions such as Ubuntu & Fedora present you with a whole disk encryption option using the LUKS system when you install them. As always in Linux if you know what you are doing there is more than one way to to it and it should be possible to set up full disk encryption on any Linux setup. I would keep and eye on shuffle cake in the future for plausibly deniable encrypted partitions in case you are ever in jurisdictions that can legally compel you to disclose your encryption keys.
- Disable any cloud based backup systems which sync your data not end-2-end encrypted to a remote server
- Your shiny new fully encrypted disk does you no good whatsoever if you are now syncing the plaintext versions of all that data to a non end-2-end encrypted cloud backup with a service like Google drive or iCloud.
- 3rd party services exist to enable local encryption of your data using keys that you hold before it is synced to the cloud e.g. boxcryptor & cryptomator who support multiple platforms/cloud ecosystems
- Alternatively you could use cloud storage platforms which are open source and end-2-end encrypted by design e.g. Internxt
- Use only trusted machines on trusted networks to login to sensitive systems If you are on public Wi-Fi use a secure VPN to provide extra protection of your web traffic
- Secure your home network determined attackers may try to steal login credentials from you when you are on a less well secured network such as on your home wi-fi
- If you have any IOT/smart devices such as TVs or other appliances keep them on a separate virtual network. An easy way to do this is to use the guest network that is usually available on commercial home routers.
- Use a strong passphrase on your network and router admin interface.
- WPA2 passwords have a max length of 63 characters so I advise using a random alphanumeric with caps/lowercase and symbols generated by you password manager here to maximise entropy in the available space. If you can move to WPA3 only which has better encryption, be sure to disable automatic WPA2 fallback to prevent older incompatible devices from compromising the improved security if possible.
- Keep your home router firmware up to date.
- If you host any services on your home network it is best to have your own VPN rather than opening ports on your home network to the internet at large. I recommend tailscale a wireguard based mesh VPN.
- Mobile
- keep your OS up to date, upgrade your device if it no longer receives security patches from its manufacturer (support windows are often criminally short, pay attention to security support windows when purchasing a device).
- Install as few apps as possible on your phone to minimize the attack surface, use the mobile browser versions of services instead of the app wherever you can. mobile web-apps running in your browser are better sand-boxed than ones installed natively.
3.5.4 Video Summary
This covers most of the operational security advice that I’ve given above if you want it in a video medium. I cover some points this misses in the text though so I’d recommend reading it as well.
NB DNS over HTTPS can cause issues resolving intranet sites and interfere with DNS based site filtering which might cause you inconveniences, it is quite effective at protecting your DNS queries but may not be worth the inconvenience.
3.6 Naming Files
For an easy life and happy bioinformatics collaborators 😎
“There are 2 hard problems in computer science: cache invalidation, naming things, and off-by-1 errors.”
- Leon Bambrick
3.6.1 Dates
If your file contains a date ALWAYS use the iso-8601 date format YYYY-MM-DD NEVER any other date format!
The main reason for this is a standard semantic sort operation on the filename will put this date format in the correct order unlike other date formats. For this reason If your filename contains a date it is often a good idea for the date to come first in the filename.
3.6.2 No spaces or special characters!
This is for at least 3 reasons.
Spaces and special characters can have special meanings in command line interfaces (CLI) and cause command-line users inconvenience trying to ‘escape’ them. ‘My Document’ must be referred to as My\ Document in most CLIs, this gets tedious if there are lot of spaces. You can quote a file with special characters in their names e.g. “My Document” but this usually breaks our filename auto-completion meaning we have to type the whole name by hand 😢.
Using underscores or _ or hyphens - in place of spaces is best. Specifically it is best to use hyphens to delimit ‘sections’ of your filename and underscores to split up multi-word ‘sections’. A good rule of thumb is can I turn my filenames into a table by splitting them at the hyphens? Think of each ‘section’ as a column4.
Experiment_1-Sample_1-WT-DrugA ✅
Experiment-1_Sample-1_WT_DrugA ❌
Always use explicit missing or negative values in file names!
If you have an experiment where you are adding something to some samples also add the lack of that thing to the other files, aim for an explicit value in every row and column of the table.
Experiment_1-Sample_2-WT-No_Drug ✅
Experiment_1-Sample_2-WT ❌
At the end of a filename this makes less of difference as you get a missing value in your last column but in the middle it’s more of a problem as now it can end up in the wrong column!
Experiment_1-Sample_2-Mutant-DrugA ✅
Experiment_1-Sample_2-DrugA ❌
This might work but an explicit value is better:
Experiment_1-Sample_2–DrugA 🆗 (note the double hyphen)
File names with missing components that confuse which columns parts of the name should end up in can be a real pain to parse and result in your bioinformatician having to do something manually 😮 (we hate that).
For example these file names can very easily become a nice table with this naming convention:
1filename <- c(
    "Experiment_1-Sample_1-WT-DrugA",
    "Experiment_1-Sample_2-WT-No_Drug"
)
2## filename <- fs::dir_ls("directory/with/files")
3filenames <- tibble::tibble(filename = filename)

4filenames %>%
5    tidyr::separate(
        filename,
        into = c("Experiment", "Sample", "Genotype", "Treatment"),
        sep = "-"
6    ) %>%
7    mutate(across(everything(), ~gsub("_"," ",.x))) %>%
8 gt::gt()- 1
- Making a table with a column called ‘filename’ which contains the names of all the files.
- 2
- In reality we’d just read all the files from the folder rather than explicitly listing them like below.
- 3
- List of filenames
- 4
- Give the filenames table to the next function
- 5
- Split the filenames column into: Experiment, Sample, Genotype, & Treatment columns by ‘-’
- 6
- Give the new table with separated columns to the next function
- 7
- We can even easily make it prettier by swapping out the _ for spaces! Alter all the columns by substituting ‘_’ for ’ ’
- 8
- Draw a pretty version of the table
| Experiment | Sample | Genotype | Treatment |
|---|---|---|---|
| Experiment 1 | Sample 1 | WT | DrugA |
| Experiment 1 | Sample 2 | WT | No Drug |
To retain as much information as possible in your filenames you can devise alternative encodings from which better formatted names can be re-constructed e.g.:
\(Gene1^{+/-}\) to Gene1_p_m
\(Gene1^{+/-};Gene2^{-/-}\) to Gene1_p_m__Gene2_m_m
A favorite utility of mine for identifying duplicate files is rdfind. It can preserve an existing directory structure with multiple copies of a file but only keep one copy on disk with hardlinks. This is convenient for reducing the size of messily structured data where people have made ‘backups’ by copying everything to another directory periodically rather than doing a differential backup.↩︎
An API (application Programming Interface) is a set of rules the two pieces of software use to communicate with one-another. You can think of it as a sort of layer between two programs. In the context of a software package it often to means changes to how functions from that package interpret arguments given to them by the programmer. Lets say I have a function
subtract()that takes 2 arguments,xandyand subtractsyfromx, in version 1.0 of my software. In version 2.0, however, I change it to subtractxfromy. This was a breaking API change as the order of the arguments now has the opposite meaning. This will change the output of thesubtractfunction in peoples code and will likely break lots of things.↩︎Yubikeys can store cryptographic secrets which are backed up elsewhere e.g. you could generate a PGP key and save it to your Yubikey and must therefore take appropriate precautions when generating and backing up that key.
E.g. generating that key in an ephemeral environment that only uses a RAM disk so it is only saved to the persistent storage that you want and never your main drive (see tails OS).↩︎
One reason for this is keyboard navigation CLI people don’t like to use the mouse if we can avoid it, it slows us down. If you hold down
Ctrland use your left and right arrow keys you can jump through text 1 word at a time in many text editors,Ctrl+Shiftpermits you to select text with the keyboard in this fashion._does not count to this action as the end of a word but-does. Thus I can highlight each section / column within a filename with a couple of keystrokes - very handy 👍.↩︎